
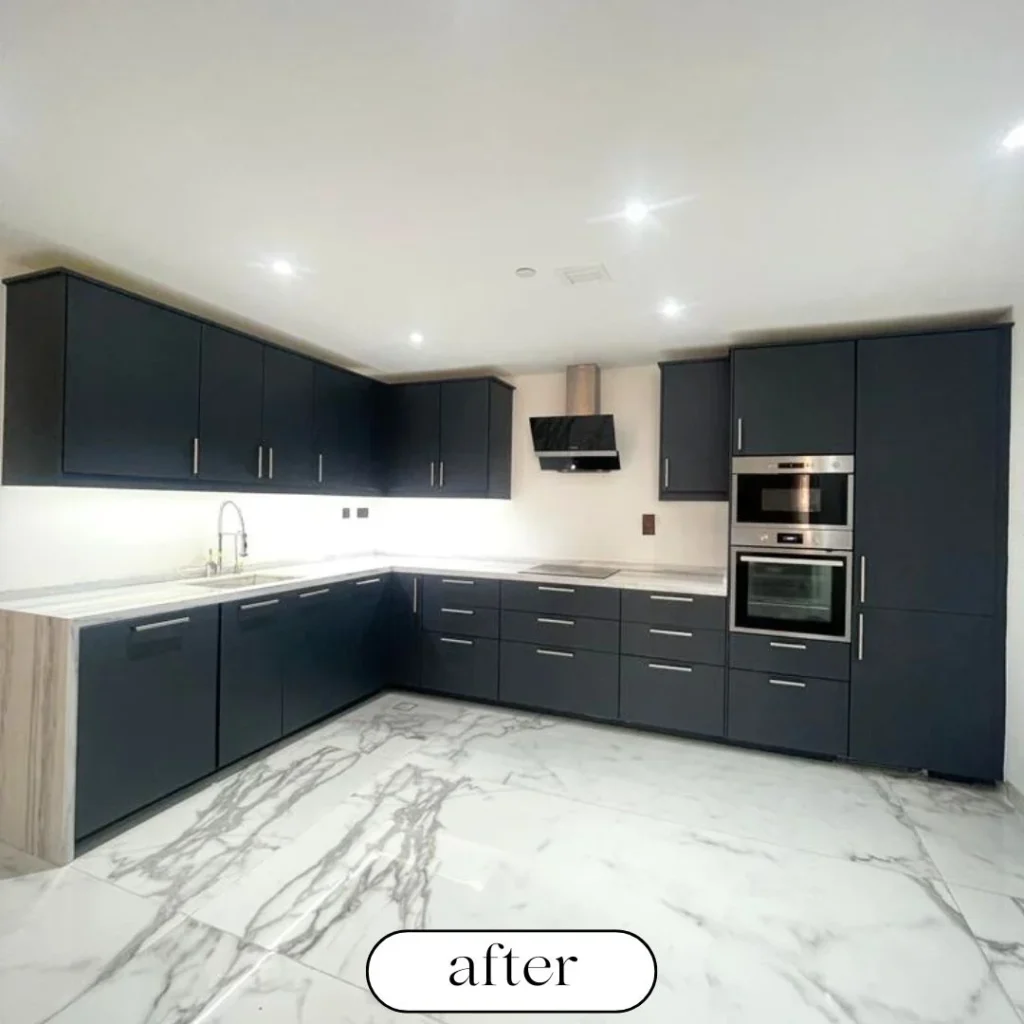
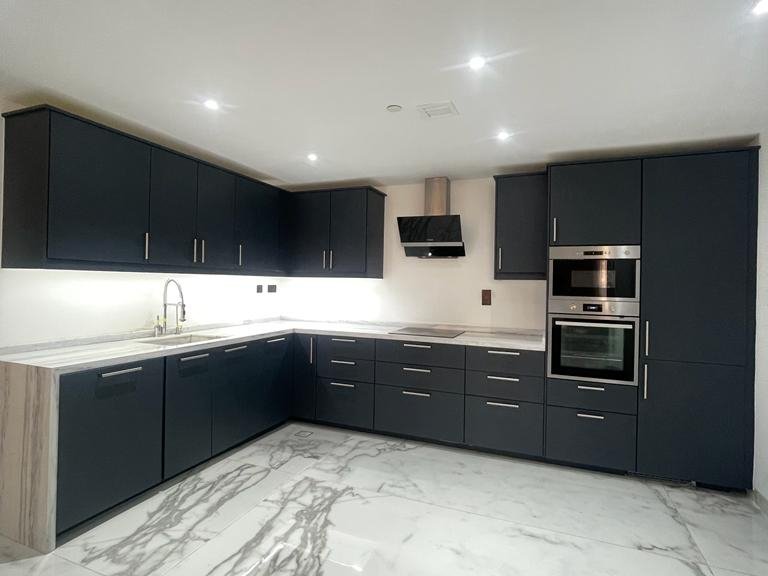
Imagine walking into your kitchen and being greeted by outdated cabinets and surfaces that have seen better days. You might feel a sinking disappointment in your stomach every time you step into this essential space.
But there’s a solution that doesn’t require a costly renovation or endless days of inconvenience. Vinyl wrap offers a transformative magic that can breathe new life into your kitchen without breaking the bank. This technique is not only budget-friendly but also incredibly versatile, allowing you to play with colors and textures to create a space that truly feels like yours.
You can easily transform dull surfaces into sleek, modern masterpieces. The best part? You don’t need to be a DIY expert to pull this off successfully. You’ll discover how vinyl wrap can be your secret weapon in fixing a broken kitchen. We’ll guide you through the process, share tips to make the application seamless, and inspire you with ideas to ignite your creativity. Prepare to turn your kitchen woes into wow moments. Keep reading to unlock the potential of your kitchen with vinyl wrap!
Benefits Of Vinyl Wrap
Transforming a broken kitchen can seem daunting. But vinyl wrap offers a practical solution. It’s a quick and effective way to breathe new life into your kitchen. Vinyl wrap brings numerous benefits, making it a popular choice for homeowners. Let’s explore these advantages in detail.
Cost-effective Solution
Vinyl wrap is budget-friendly. It costs much less than a full renovation. You can achieve a modern look without spending a fortune. This makes it perfect for those on a tight budget. Save money while still getting a fresh kitchen look.
Versatility In Design
Vinyl wrap offers countless design options. You can choose from various colors and patterns. Want a wood finish or a sleek metallic look? Vinyl wrap makes it possible. It’s easy to match your personal style and home decor.
Durability And Maintenance
Vinyl wrap is durable and long-lasting. It resists scratches and stains. This makes it ideal for busy kitchens. Cleaning is simple too. Just wipe it down with a damp cloth. Your kitchen stays looking new with minimal effort.
Choosing The Right Vinyl Wrap
Transform your kitchen with the right vinyl wrap choice. Enhance your space’s appearance without breaking the budget. Durable and stylish, vinyl wraps offer a quick fix for damaged surfaces, making your kitchen look fresh and modern.
Are you tired of your outdated kitchen but dread the cost and chaos of a complete renovation? Vinyl wrap is an affordable and hassle-free solution to give your kitchen a fresh look. Choosing the right vinyl wrap is crucial to ensure it complements your space and stands the test of time.
Color And Pattern Selection
The first thing you’ll notice about vinyl wrap is the vast array of colors and patterns available. This is where your creativity can shine. Do you prefer bold colors or subtle shades? Think about the mood you want to create in your kitchen. A bright yellow could energize your mornings, while a muted grey might offer a calming effect. Patterns like faux wood or marble can add a touch of sophistication without the high price tag.
Material Quality Considerations
Quality matters when it comes to vinyl wrap. You want something durable that can handle the everyday wear and tear of a busy kitchen. Look for wraps that offer scratch resistance and are easy to clean. A high-quality wrap will not only enhance the look of your kitchen but also extend its lifespan. Imagine your kitchen looking fresh and stylish for years with minimal effort. Isn’t that a dream come true for any homeowner?
Matching Style With Existing Decor
Your kitchen should feel like a cohesive part of your home. Consider the existing decor and architecture. Does your kitchen flow seamlessly into the dining area or living room? Matching the style is more than just picking the right color. It’s about ensuring the texture and pattern fit with your existing decor. Maybe your dining room has rustic wooden elements; a wood-patterned vinyl wrap could tie the spaces together beautifully. Choosing the right vinyl wrap doesn’t have to be overwhelming. It’s about expressing your style while ensuring functionality. What does your kitchen say about you? Make sure it tells the story you want.
Preparation And Planning
Transforming a broken kitchen with vinyl wrap requires careful preparation and planning. This step sets the foundation for a seamless application. Proper preparation ensures the vinyl adheres well and lasts longer. Let’s explore the key aspects of preparation and planning.
Assessing Kitchen Surfaces
Start by examining all kitchen surfaces. Look for cracks, chips, or other damages. Identify surfaces that need repair before applying vinyl. Ensure all areas are smooth and ready for the wrap.
Gathering Necessary Tools
Prepare a toolkit with all essential items. You will need a vinyl wrap, a utility knife, and a squeegee. Consider a heat gun for better adhesion on curved surfaces. A measuring tape helps in cutting precise pieces. Keep a cleaning solution handy for surface preparation.
Cleaning And Surface Prepping
Clean the surfaces thoroughly. Remove all dirt, grease, and grime. Use a mild detergent or a dedicated cleaner. Dry the surfaces completely to prevent moisture trapping. Check for any remaining debris or sticky residue. Smooth out rough patches to ensure even application.
Application Process
Transform your kitchen easily with vinyl wrap. Clean the surfaces first. Measure the sections carefully. Cut the vinyl to fit. Stick it smoothly onto the cabinets. Smooth out air bubbles for a neat finish. A simple process can bring new life to your broken kitchen.
Transforming your kitchen with vinyl wrap is a fantastic way to breathe new life into tired cabinets without a hefty price tag. The application process is where your vision starts to take shape. It’s a task that requires patience and precision, but the results can be stunning. You’ll need a steady hand and a keen eye for detail to ensure everything fits perfectly. Ready to dive in and give your kitchen a fresh look?
Measuring And Cutting Vinyl
Before you start, gather all the necessary tools: a tape measure, utility knife, and a squeegee. Accurate measurements are crucial. Measure each cabinet door and drawer front meticulously. Cut the vinyl slightly larger than the actual size to allow some room for error. It’s always easier to trim excess than to deal with a shortage. Have you ever tried to fit a puzzle piece that just won’t fit? That’s what it feels like if your vinyl is too small.
Applying Vinyl To Cabinets
Clean the cabinet surfaces thoroughly to ensure the vinyl adheres well. Dust and grease can cause bubbles and wrinkles. Once clean, peel a small section of the backing from the vinyl. Start at one corner and use a squeegee to press the vinyl onto the surface. Move slowly and methodically, smoothing out bubbles as you go. It’s like wrapping a gift – smooth, steady strokes make all the difference.
Handling Corners And Edges
Corners and edges can be tricky, but they’re the finishing touches that make your work look professional. Use a hairdryer to gently heat the vinyl, making it more pliable. This will help it conform to the cabinet’s shape. Carefully stretch and press the vinyl around corners, using your fingers to smooth it into place. For edges, use a utility knife to trim excess vinyl, leaving a small overlap that you can tuck under. Think of it like hemming a pair of pants – neat edges make everything look tailored and polished. Have you ever taken on a home project that seemed intimidating at first, but you were thrilled with the end result? Fixing a broken kitchen with vinyl wrap might just be your next success story.
Common Mistakes To Avoid
Fixing a broken kitchen with vinyl wrap is a smart choice. It’s cost-effective and gives a fresh look. Yet, some mistakes can ruin the effort. Understanding these errors helps achieve a flawless finish.
Incorrect Measurements
Measurement mistakes are common but easy to avoid. Always measure twice before cutting the vinyl. A wrong size can lead to wastage. It also makes the wrap look untidy. Use a tape measure for accurate results. Ensure each cabinet or surface gets measured separately. This avoids any size misjudgment.
Air Bubbles And Wrinkles
Air bubbles and wrinkles often spoil the appearance. Applying vinyl in a hurry causes these flaws. Use a squeegee to press the wrap smoothly. Start from one edge and move gradually. This method helps push air out. Heat guns are useful too. They make the vinyl flexible and reduce wrinkles.
Ignoring Manufacturer Instructions
Manufacturer instructions are essential for a perfect vinyl finish. Each brand might have different guidelines. Ignoring these leads to poor adhesion or damage. Read all steps before starting the application. Follow recommendations on cleaning surfaces. This ensures the vinyl sticks properly and lasts longer.
Maintaining Your New Look
Fixing a broken kitchen with vinyl wrap is a smart choice. This cost-effective solution gives your kitchen a fresh look without major renovations. Once your kitchen is wrapped, maintaining its new appearance is crucial. Regular care ensures that your kitchen stays vibrant and functional.
Cleaning Tips
Clean your vinyl wrap regularly to keep it looking fresh. Use a soft cloth and mild detergent for wiping surfaces. Avoid harsh chemicals which might damage the wrap. Clean spills immediately to prevent stains. Regular dusting helps maintain brightness.
Repairing Minor Damages
Minor damages can occur despite careful handling. For small scratches, use a vinyl repair kit. Follow instructions for the best results. If a section peels, gently reapply it using adhesive. Avoid pulling to prevent further damage.
Longevity And Care
Proper care extends the lifespan of your vinyl wrap. Keep it away from excessive heat sources. Ensure ventilation to prevent moisture buildup. Regular inspection helps catch issues early. Treat it with care to maintain its charm.
Creative Ideas For Vinyl Wrap
Vinyl wrap offers a versatile solution for rejuvenating kitchen spaces. This material provides an economical way to transform surfaces without extensive renovations. Explore creative ideas that maximize vinyl wrap’s potential. Discover how to bring new life to your kitchen with stunning designs and textures.
Accent Walls And Backsplashes
Accent walls can redefine your kitchen’s character. Vinyl wrap allows for bold color choices. Transform a dull wall into a focal point. Choose vibrant hues that complement existing decor. For backsplashes, vinyl wrap provides a protective yet stylish finish. Select patterns that enhance your countertop. Experiment with geometric shapes or floral designs. Each choice adds a personal touch to your space.
Mixing Textures And Finishes
Combine different textures to create depth. Matte finishes can contrast with glossy surfaces. This pairing adds visual interest. Vinyl wraps can mimic natural materials. Wood grain or stone effects bring warmth. These textures add sophistication without the cost. Mixing finishes can highlight specific areas. A glossy island can stand out against matte cabinets. This contrast draws attention to key features.
Innovative Patterns And Themes
Patterns can transform ordinary kitchens into unique spaces. Explore abstract designs for a modern vibe. Vintage themes add a nostalgic touch. Use stripes for a clean, structured look. Patterns can evoke different moods. Tropical prints create a lively atmosphere. Neutral tones offer a calm, serene environment. Themes can reflect personal style. Choose designs that resonate with your personality.
Frequently Asked Questions
Is Vinyl Wrapping A Kitchen A Good Idea?
Vinyl wrapping a kitchen is a cost-effective and stylish option. It updates cabinets without full replacement. The process is quick, causing minimal disruption. Vinyl is durable, easy to clean, and available in various designs. Ensure professional installation for optimal results.
It’s a great choice for a fresh, modern look.
Can Vinyl Wrap Kitchen Doors Be Repaired?
Yes, vinyl wrap kitchen doors can be repaired. Minor damage like peeling can often be fixed with adhesive. For larger issues, consider professional repair services. Regular maintenance helps prolong their lifespan. Repairing vinyl wrap doors is cost-effective compared to replacement, ensuring your kitchen remains stylish and functional.
Does Vinyl Wrap Last In Kitchen?
Vinyl wrap can last 5-10 years in kitchens. Proper installation and care extend its lifespan. It’s durable, moisture-resistant, and easy to clean, making it suitable for kitchen surfaces. Regular cleaning prevents wear and tear. Avoid direct heat sources to maintain its condition longer.
How Much Does It Cost To Vinyl Wrap A Kitchen?
Vinyl wrapping a kitchen typically costs between $1,000 and $2,500. Prices vary based on kitchen size and material quality. Professional installation ensures durability and a seamless look. Always compare quotes from different providers to find the best deal.
Conclusion
Transforming your kitchen with vinyl wrap is practical and affordable. It gives tired cabinets a fresh look without hefty renovation costs. The application process is simple, requiring basic tools and patience. This method suits renters and homeowners alike, offering versatility and style.
Choose colors and textures that match your taste. The wrap is durable, resisting scratches and stains. This DIY approach saves money and time. Your kitchen will reflect your personality. Vinyl wrap helps you create a cozy, inviting space. Perfect for cooking and gathering.
Enjoy your refreshed kitchen space!