
Most homeowners want a fresh kitchen look but dread the mess and cost of paint. That’s why many are now learning how to update kitchen cabinets without painting—and honestly, it’s a game changer. After years of helping clients transform their spaces in Dubai, one thing stands out: cabinet wrapping offers a clean, fast, and affordable fix that actually lasts. This guide takes a closer look at what works, what doesn’t, and answers real questions like can you vinyl wrap kitchen cabinets or what is the best order to remodel a kitchen? Read on for honest insights that go beyond the surface.
Why Skip Painting?
Painting kitchen cabinets might seem like the simplest solution—but it often isn’t. One homeowner in Dubai, for example, shared deep regret over repainting her cabinets, even more than her outdated beige backsplash. After weeks spent sanding, sealing, and spraying, the paint began chipping around the handles in less than six months. And her experience wasn’t unique.
The Downsides of Painting Kitchen Cabinets
Painting cabinets can feel like trying to fix a leaky faucet with glitter—it looks good for a bit, but the problems creep back. First, it’s time-consuming. Between priming, drying, and curing, you could lose access to your kitchen for a week or more. It also needs proper ventilation, which can be tricky in apartments or during hot Dubai summers when windows stay shut to keep out the heat.
Worst of all? Paint fades, chips, and stains faster than you’d expect—especially in high-use areas like kitchens. Even premium paint doesn’t always stand up to cooking oil, steam, and daily wear.
The Benefits of Non-Paint Solutions
That’s why more people are asking how to update kitchen cabinets without painting. Options like cabinet wrapping offer a clean, fast, and flexible alternative. There’s no mess, no smell, and no waiting days for layers to dry. In most cases, your kitchen stays fully usable during the wrap process.
Vinyl wraps also come in a variety of finishes—woodgrain, matte, marble, even textured stone. They’re waterproof, durable, and surprisingly easy to maintain. Plus, if tastes change or tenants move out, wraps can be removed or replaced with minimal fuss.
Cabinet Wrapping: The Best Alternative to Painting
When people ask how to update kitchen cabinets without painting, experts often point to one solution first: cabinet wrapping. It’s clean, quick, and shockingly stylish. For example, a client in Dubai Marina was frustrated with her dull white cabinets but couldn’t afford the mess—or downtime—of repainting. She was introduced to vinyl wrapping, and within two days, her kitchen had a sleek matte black finish that looked like it belonged in a design magazine.
What Is Cabinet Wrapping?
Cabinet wrapping is a modern method of updating your cabinets using vinyl film—a flexible, adhesive material that sticks to the cabinet surface. Think of it like giving your kitchen a high-end makeover without sanding, priming, or painting. It’s stylish, durable, and totally mess-free.
What makes wrapping special is the variety of finishes available. From glossy white to warm woodgrain to elegant marble effects, wraps can completely transform your space to match your style—whether it’s minimal, modern, or classic.
How Does Cabinet Wrapping Work?
The process is pretty simple and quick—no loud tools, no strong smells, and no long wait times. First, your cabinets are cleaned and prepped. Then, the vinyl wrap is measured, cut, and applied carefully to each door and drawer front using tools like a squeegee and heat gun to ensure smooth edges and a tight seal.
You can choose from:
- Matte finishes for a soft, modern look
- Glossy finishes for that polished showroom feel
- Woodgrain textures to mimic oak, walnut, or teak
- Stone or marble effects that add instant elegance
Most wraps are also waterproof and scratch-resistant, making them ideal for busy Dubai kitchens that deal with daily cooking, cleaning, and climate shifts.
Can You Wrap Kitchen Cabinets?
Yes, absolutely—you can wrap kitchen cabinets, and it works on a variety of surfaces. MDF, laminate, melamine, and smooth wooden cabinets are perfect candidates for wrapping. As long as the surface is flat, clean, and in decent shape, it’s usually good to go.
However, wrapping is not recommended for cabinets with heavy water damage, peeling laminate, or rough, uneven textures. In those cases, repairing the surface first is key for a lasting finish.
How to Wrap Kitchen Cabinets Step-by-Step
Wrapping your kitchen cabinets might sound intimidating, but trust me—it’s easier than it looks. I’ve worked with dozens of homeowners across Dubai who were first-timers, and they pulled it off beautifully with just a bit of patience and the right tools. One client in Downtown Dubai even did it over a weekend while her kids were at a sleepover—by Monday, her old beige cabinets were transformed into sleek, matte navy with gold handles. Let’s break down how you can do it too.
4.1 Tools and Materials Needed
Before you begin, gather all your supplies. It makes the process smoother and less stressful. Here’s what you’ll need:
- Vinyl wrap sheets (choose your preferred texture or color)
- Heat gun or hairdryer
- Felt-edge squeegee (to avoid scratching)
- Sharp utility knife or precision cutter
- Sharp utility knife or precision cutter
- Measuring tape and ruler
- Measuring tape and ruler
- Cleaner like isopropyl alcohol or a grease-cutting solution
- Microfiber cloths
- Microfiber cloths
- Optional: Gloves, masking tape, and a soft roller
You can find most of these tools at home improvement stores or order a full wrapping kit online.
4.2 Preparation
A smooth wrap starts with a clean surface. Skip this step and you’ll regret it—I’ve seen wraps peel due to hidden grease from cooking!
- Clean the cabinets with isopropyl alcohol or a degreaser. Focus on edges and corners.
- Remove all handles, knobs, and hinges. Keep them labeled in a bowl or bag.
- Take off cabinet doors if possible. It’s not a must, but it helps get cleaner edges.
- Let everything dry completely before wrapping.
💡 Pro tip: Label each door and drawer with masking tape so you know exactly where to put them back.
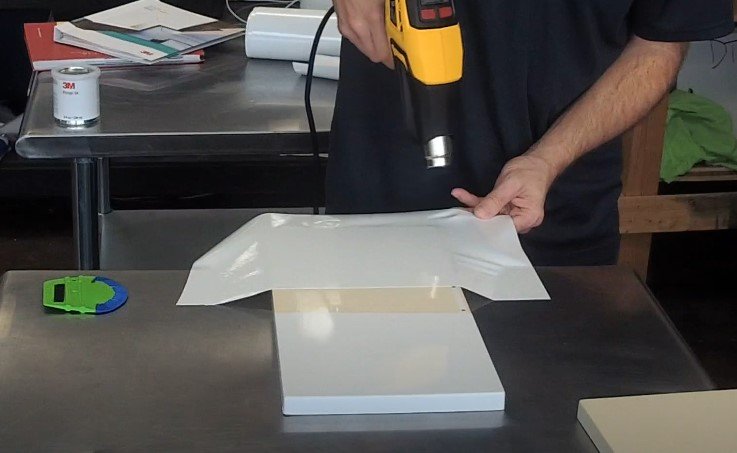
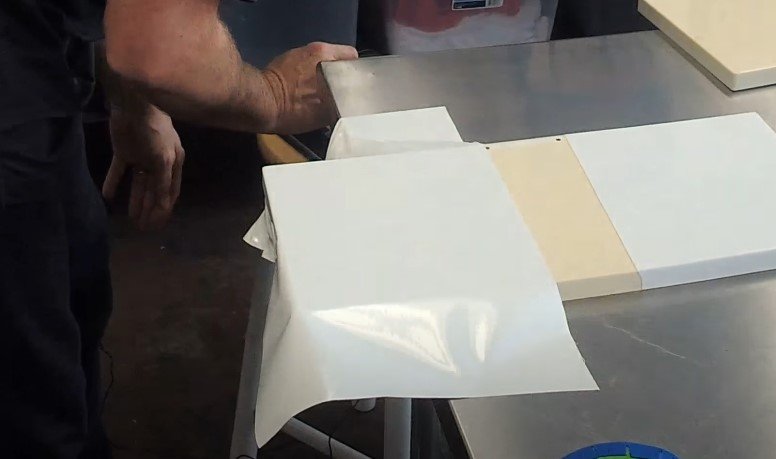
4.3 Application Process
This is where the magic happens! Don’t rush—take it one panel at a time.
- Measure and cut the vinyl slightly larger than your cabinet door. It’s better to trim later than fall short.
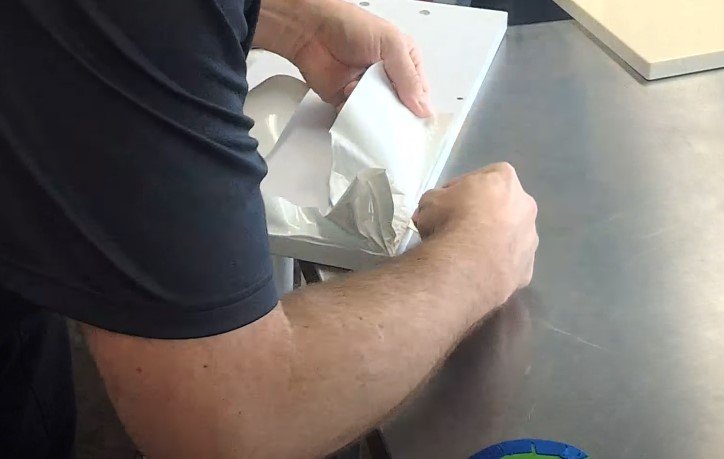
- Peel off a bit of the backing, align it with your cabinet, and press gently.
- Use the felt-edge squeegee to smooth out air bubbles as you go. Work slowly in sections.
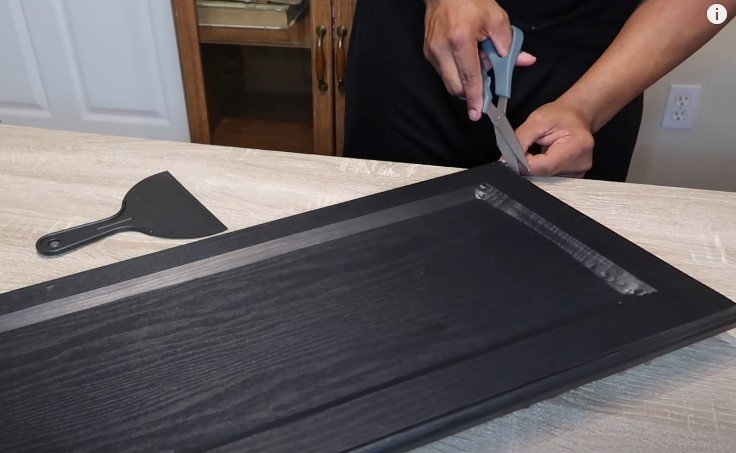
- Use a heat gun to soften the vinyl around corners and edges. This helps it stretch and grip.
- Trim the excess with a utility knife, especially around hinges and hardware holes.
- Repeat for all doors and drawer fronts.
🛑 Avoid stretching the vinyl too much. It can cause lines, bubbles, or peel-back later.
4.4 Tips for a Professional Finish
Here are a few golden rules I’ve learned (sometimes the hard way):
- Work in a dust-free area. Even tiny particles can cause bumps under the wrap.
- Start with flat surfaces before trying detailed edges or shaker-style doors.
- Apply light heat only where needed—too much heat can warp the vinyl.
- Always wrap around the edges for a seamless look and stronger hold.
- Don’t rush the trimming. Clean edges make all the difference.
Advantages of Wrapping Kitchen Cabinets
If you’re wondering how to update kitchen cabinets without painting, cabinet wrapping might just be your best-kept secret. It’s one of those upgrades that looks high-end, but doesn’t require a messy remodel or weeks of chaos. Over the years, I’ve seen homeowners across Dubai completely transform their kitchens in just a day or two—with zero paint fumes, no sanding dust, and definitely no regrets.
Let’s explore why wrapping your cabinets is such a game-changer.
1. Durable and Waterproof
Kitchen cabinets take a lot of heat—literally. Between cooking steam, water splashes, and greasy fingers, durability matters. The good news? High-quality vinyl wrap is made to withstand it all. It’s water-resistant, handles daily wear well, and doesn’t chip like paint.
2. Easy to Clean and Maintain
Vinyl-wrapped cabinets are incredibly easy to clean. Spills, grease, and fingerprints can be wiped away with just a damp cloth—no need for harsh chemicals or deep cleaning routines. This makes them ideal for busy families or rental properties where low maintenance is essential. One landlord in Dubai, for instance, relies on cabinet wrapping to keep his kitchen units looking fresh between tenants, avoiding the need for costly makeovers.
3. Reversible and Rental-Friendly
Not ready to commit to a permanent change? Wrapping is fully reversible. You can peel it off whenever you want, with no damage to the original surface—perfect for renters or anyone who likes to switch things up often.
A young couple in Dubai Marina wrapped their cabinets in walnut woodgrain vinyl to match their dining set. When they moved out a year later, they simply removed it—and got their full security deposit back.
4. Affordable Compared to a Full Remodel
Let’s be honest—kitchen renovations can be expensive. But wrapping your cabinets gives you a dramatic new look at a fraction of the cost. You don’t need to replace cabinets or hire painters. It’s budget-friendly and DIY-friendly.
Comparing Cabinet Wrapping vs Painting
So, you’re torn between wrapping and painting your kitchen cabinets? You’re not alone. Many Dubai homeowners face the same question when trying to give their kitchen a facelift without breaking the bank.
Let’s break down the key differences so you can make the best choice for your space, your time, and your budget.
At a Glance: Wrapping vs Painting
| Feature | Painting Cabinets | Wrapping Cabinets |
| Cost | Moderate to high | Low to moderate |
| Time Required | Several days | 1–2 days |
| Durability | Prone to chipping & fading | Highly durable & waterproof |
| Design Flexibility | Limited to paint colors | Wide range of textures & finishes |
| Reversibility | Not easily reversible | Fully removable |
Why Many Choose Wrapping Over Painting
- Less Mess, Less Stress: No sanding, no fumes, no paint splatter on your tiles.
- Faster Turnaround: Most vinyl wrap jobs are done in a day or two—perfect for busy households.
- More Style Options: Love marble, woodgrain, or a soft velvet finish? You won’t find those in a paint can.
- Easier to Undo: If you’re renting or love changing up your style, wrapping gives you the freedom to switch without damage.
But Painting Still Has a Place…
If you’re going for a traditional or rustic look with a solid, classic color—like matte navy or crisp white—painting can deliver that depth. Especially if you’re working with solid wood cabinets and don’t mind the longer process.
That said, for most modern Dubai homes, especially apartments and rentals, cabinet wrapping is the smarter, quicker, and more versatile choice.
Takeaway: If you’re still wondering how to update kitchen cabinets without painting, vinyl wrapping clearly stands out as the cleaner, faster, and more durable solution.
Other Creative Ways to Update Kitchen Cabinets (Without Paint)
Updating kitchen cabinets doesn’t always require a paintbrush—or the mess that comes with one. In fact, many homeowners in Dubai have found stylish, practical ways to refresh their kitchens without picking up a single can of paint. These clever alternatives offer a quick visual upgrade, often with minimal effort and cost.
Swap Out Cabinet Hardware
One of the simplest yet most effective upgrades is replacing old handles and knobs. A client in Jumeirah once swapped dated brass knobs for sleek matte black pulls, instantly giving their kitchen a more contemporary look. Hardware is like cabinet jewelry—it can make a big difference without much work.
Add Under-Cabinet Lighting
Lighting can transform how a kitchen feels. Installing LED strip lights under cabinets not only adds a modern glow but also improves visibility while cooking. This upgrade is renter-friendly, budget-conscious, and surprisingly easy to install. Plus, it’s a favorite among interior stylists for adding ambiance.
Introduce Glass Panels or Open Shelving
Replacing a few cabinet doors with glass panels—or removing them entirely for open shelving—adds airiness to the space. Many Dubai residents prefer this option to showcase decorative dishware or to make smaller kitchens feel larger. It’s an elegant twist that blends function with design.
Use Peel-and-Stick Backsplashes
The area behind cabinets is often overlooked, yet it has major style potential. Peel-and-stick backsplash tiles come in dozens of finishes, from marble to Moroccan tile patterns. They’re waterproof, heat-resistant, and easy to remove—ideal for both owned and rented spaces.
These alternatives prove there are many ways to update kitchen cabinets without painting. Whether it’s changing hardware or adding lighting, each option offers a fresh perspective without the commitment of paint. With the right mix of upgrades, any kitchen can feel brand new—without the mess or the fumes.
What is the Best Order to Remodel a Kitchen?
Remodeling a kitchen can feel overwhelming without a clear plan. Many homeowners in Dubai and beyond often ask, “What is the best order to remodel a kitchen?” Getting the sequence right isn’t just about convenience—it saves time, prevents costly mistakes, and ensures everything fits together seamlessly.
Start with the Big Decisions
Before anything physical begins, the layout, style, and budget should be locked in. This helps avoid mid-project changes that can delay timelines or blow up costs. A Dubai family once redesigned their kitchen three times before finalizing the layout, which pushed the entire renovation back by weeks.
1. Plumbing and Electrical First
Any upgrades involving pipes, outlets, or lighting must come first. Whether it’s moving a sink or installing new pendant lights, these changes happen behind the walls—so they should be done before anything else is installed.
2. Structural and Flooring Updates
If the renovation includes knocking down walls or laying new floors, this step comes next. Flooring should be laid before installing lower cabinets to create a clean, continuous surface.
3. Install Cabinets and Countertops
Once the foundation work is done, it’s time for the cabinetry. This is where wrapping comes into play. Updating cabinet finishes—such as using vinyl wrap instead of paint—fits perfectly at this stage. It offers a mess-free, fast transformation that won’t interfere with other finishes.
4. Add Appliances and Fixtures
With cabinets in place, major appliances like ovens, fridges, and dishwashers can be installed. It’s also a good time to fit sinks, taps, and lighting fixtures.
5. Final Touches and Décor
Last come the details—backsplash tiles, shelf styling, under-cabinet lighting, and fresh hardware. These finishing touches bring the entire design together.
Why This Order Matters
By following this sequence, homeowners avoid rework, protect new finishes, and ensure everything—from cabinets to countertops—fits properly. Choosing to update kitchen cabinets without painting, especially with wrapping, works best when done after structural tasks but before adding decorative elements.
FAQs: How to Update Kitchen Cabinets Without Painting
Q1: How can I update kitchen cabinets without painting them?
Vinyl wrapping is the best way to update kitchen cabinets without painting. It’s fast, clean, and gives a high-end look with no mess or fumes.
Q2: Can you vinyl wrap kitchen cabinets yourself at home?
Yes, homeowners can wrap kitchen cabinets themselves. With vinyl wrap, basic tools, and patience, you can refresh cabinets in a day or two.
Q3: Is vinyl wrap a good alternative to painting kitchen cabinets?
Yes, vinyl wrap is durable, waterproof, and easy to clean. Unlike paint, it doesn’t chip or fade quickly and is fully removable when needed.
Q4: What surfaces can be wrapped with vinyl in a kitchen?
Vinyl wrap works well on flat, clean cabinet surfaces like MDF, laminate, melamine, and smooth wood. Avoid damaged or uneven textures.
Q5: How long does cabinet vinyl wrap last in a kitchen?
High-quality vinyl wraps can last 5 to 10 years with proper care. They resist steam, heat, and oil—perfect for busy kitchens in Dubai.
Final Thoughts
For anyone wondering how to update kitchen cabinets without painting, cabinet wrapping is a smart, modern solution. It’s fast, clean, and affordable—ideal for busy homes in Dubai and beyond.
Instead of messy paint jobs, wrapping offers a sleek finish in just a day or two. One homeowner replaced peeling white paint with a warm oak wrap and transformed the entire kitchen—no fumes, no hassle.
With its durability, design flexibility, and reversibility, cabinet wrapping is perfect for renters and owners alike. It’s a stylish, low-commitment way to refresh any kitchen without picking up a paintbrush.